Gross Weight of Last 8 Draw Tool Box
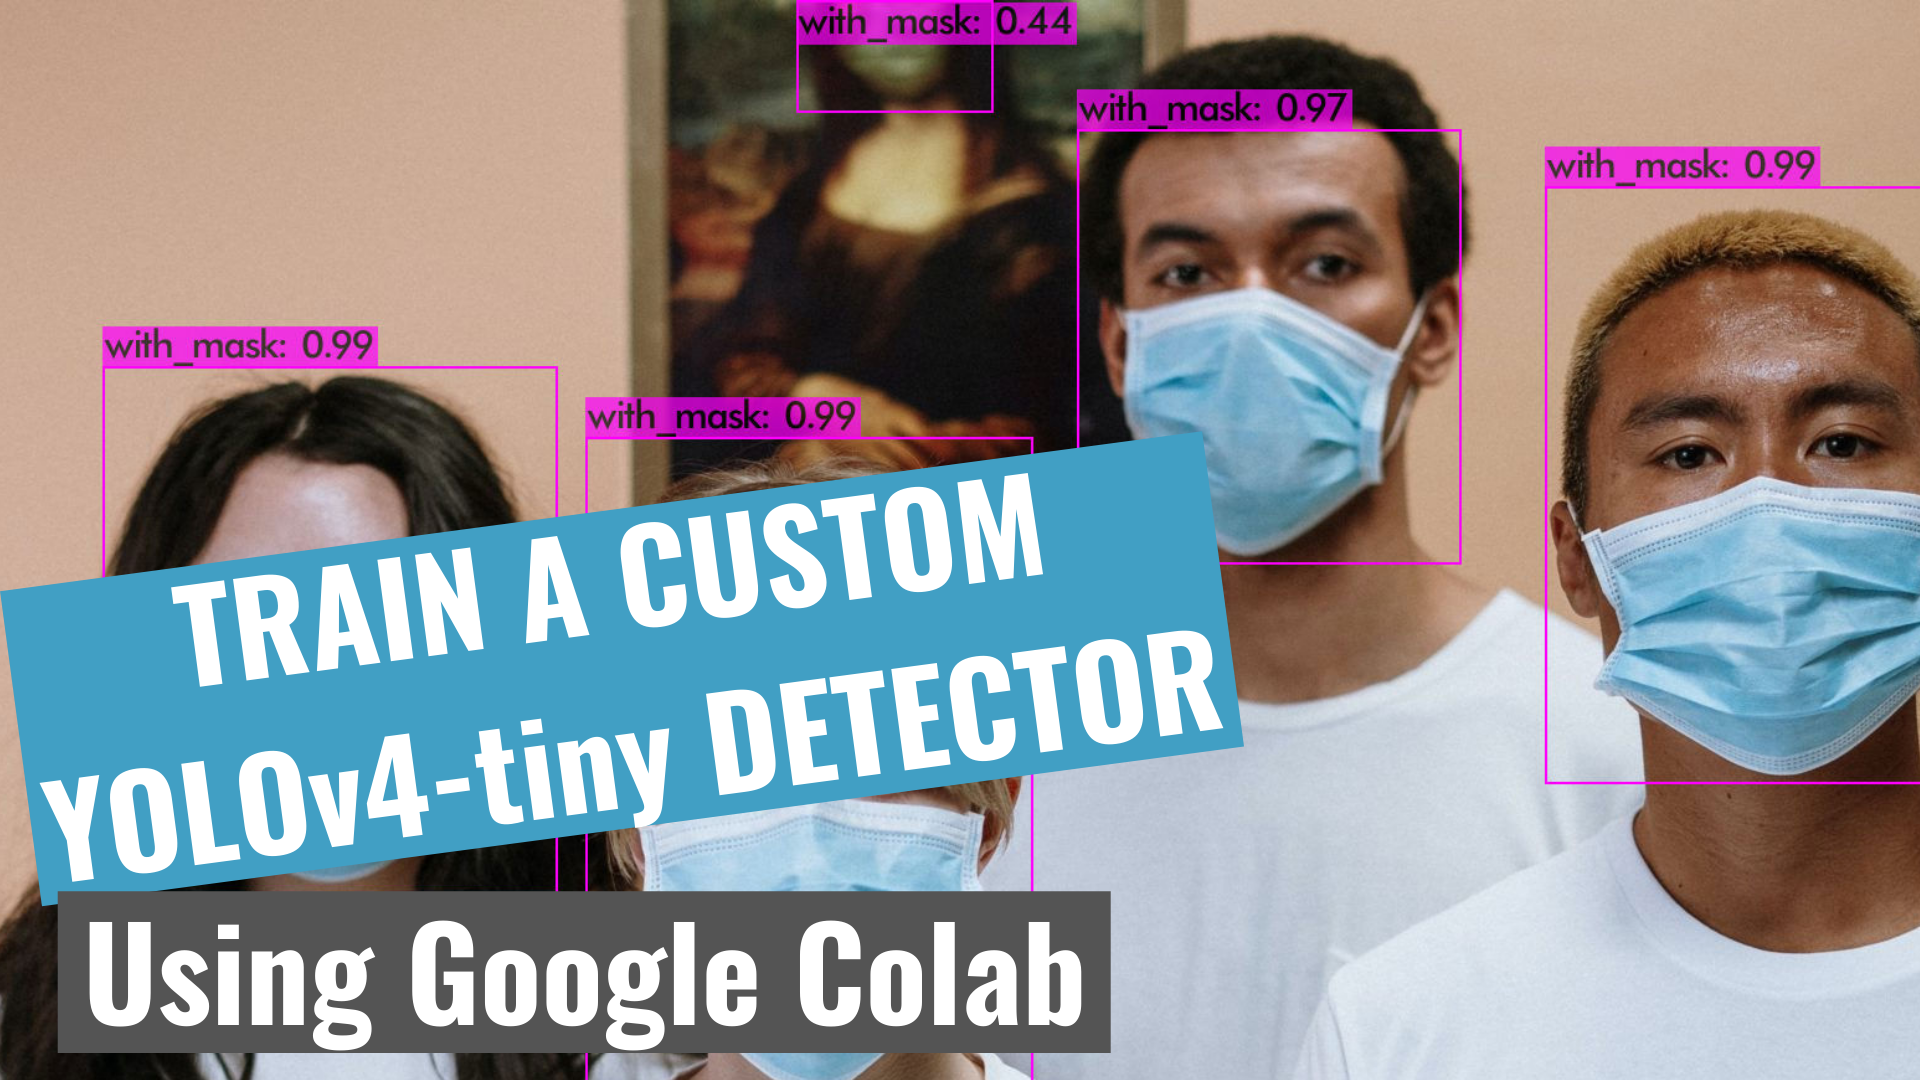
TRAIN A CUSTOM YOLOv4-small OBJECT Demodulator Exploitation Google COLAB
Tutorial for beginners
![]()

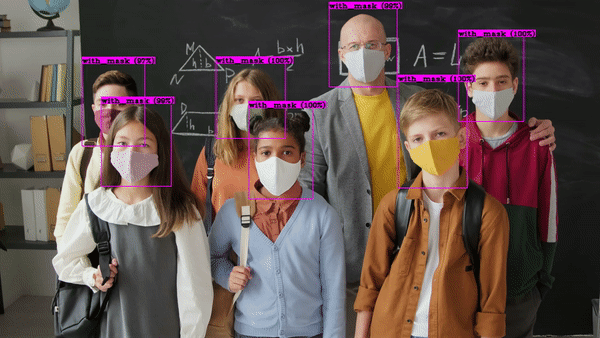
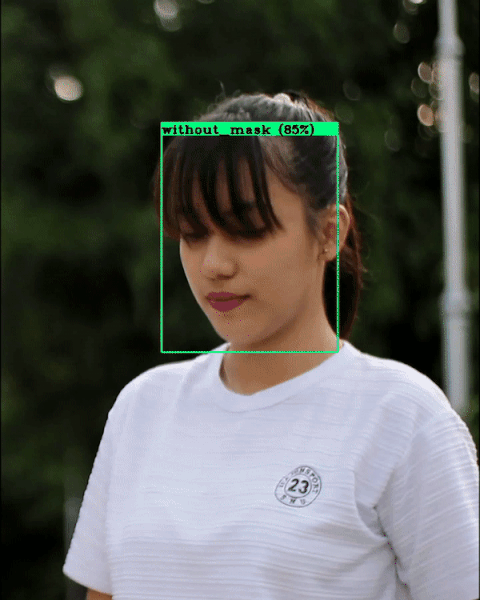
In this tutorial, we wish be training our custom detector for mask detection using YOLOv4-lilliputian and Darknet. YOLOv4-tiny is preferable for real-prison term object detection because of its faster inference time.
My YouTube video on this!
HOW TO Commenc?
- ✅Subscribe to my YouTube channel 👉🏻 https://bit.ly/3Ap3sdi 😁😜
- Open my Colab notebook on your browser.
- Click happening File in the menu bar and click happening Save a copy in drive. This will open a copy of my Colab notebook computer along your browser which you can now purpose.
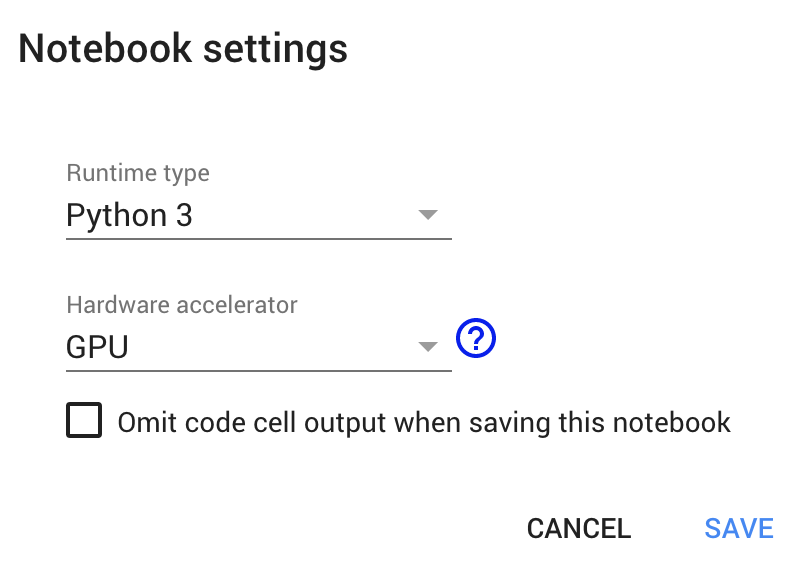
- Next, once you have opened the copy of my notebook computer and are connected to the Google Colab VM, click happening Runtime in the menu bar and click on Alteration runtime type. Select GPU and click happening save.
Stick to THESE 12 Stairs TO TRAIN AN OBJECT Sensor USING YOLOv4-tiny
( NOTE: Except for the customs duty config register and the pre-trained weights file steps, all other steps are the Same as in the previous custom YOLOv4 training tutorial(https://spiritualist.com/analytics-vidhya/train-a-custom-yolov4-object-sensor-using-google-colab-61a659d4868). I stimulate also made incomparable new change for this YOLOv4-tiny Tutorial, where we bequeath be cloning the Darknet rotter repository onto the Colab cloud VM itself, unlike the past YOLOv4 instructor where we cloned the repository in a folder on our google drive.)
Google Colab instances have faster memory board than google get. If we access files from google movement which has a larger access time, we will puzzle low speed. So here we will copy the files to colab instance then trail our detector model which will make the process faster.
- Clone the Darknet git repository onto the Colab VM
- Create yolov4-tiny and grooming folders in your google drive away
- Make up &adenylic acid; upload the files we penury for training ( i.e. "obj.zip" , "yolov4-tiny-custom.cfg", "obj.data", "obj.names" and "process.py" ) to your force
- Mount movement and link your folder
- Make changes in the Makefile to enable OPENCV and GPU
- Run hit command to build darknet
- Imitate the files "obj.zip", "yolov4-tiny-customs duty.cfg", "obj.data", "obj.names", and "process.py" from the yolov4-tiny folder to the darknet directory in Colab VM
- Run the process.py Python handwriting to create the train.txt & test.txt files
- Download the pre-trained YOLOv4-tiny weights
- Train the sensor
- Check performance
- Test your custom Object Detector
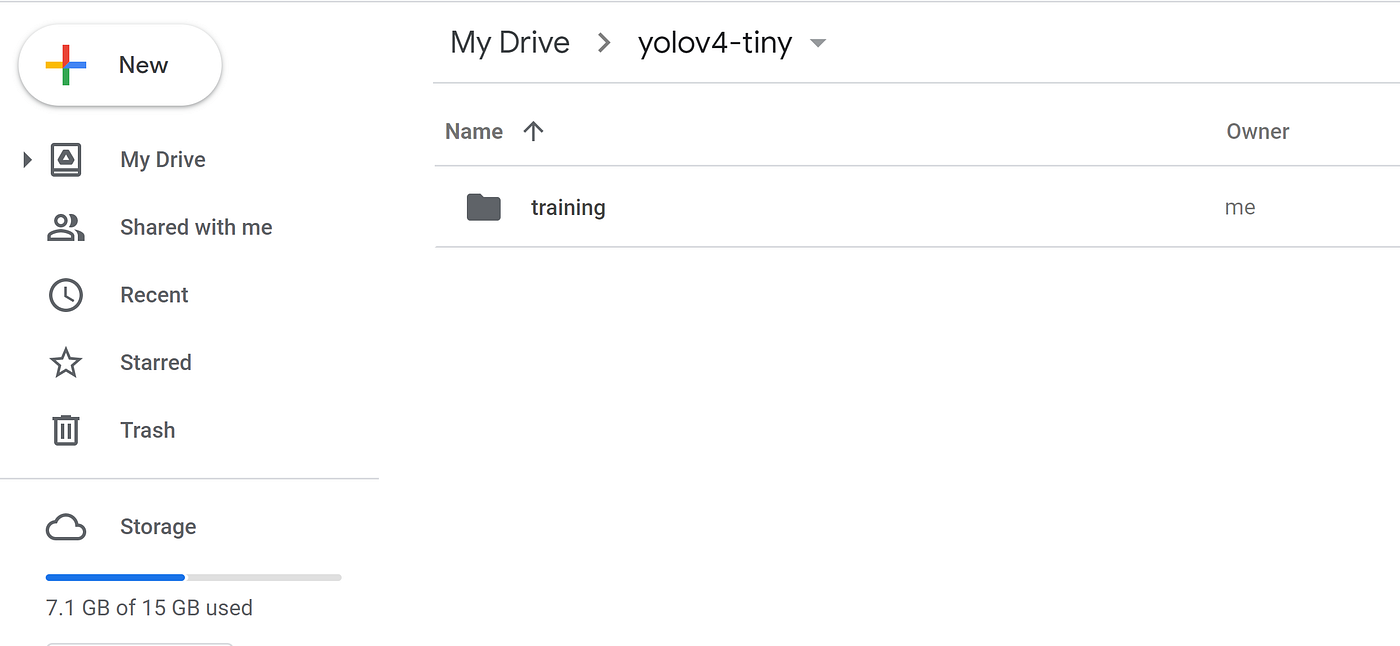
2) Create 'yolov4-tiny' and 'training' folders in your drive
Create a folder titled yolov4-tiny in your drive. Next, create other folder named grooming inside the yolov4-tiny folder. This is where we will save our drilled weights (This path is mentioned in the obj.information file which we will upload later)
3) Create & upload the following files which we need for education a custom detector
                          a. Labeled Tailored Dataset
b. Custom cfg file
c. obj.data and obj.names files
d. process.py file (to create train.txt and test.txt files for training)
I have uploaded my custom files for mask detective work along my GitHub. I am working with 2 classes i.e. "with_mask" and "without_mask".
Labeling your Dataset
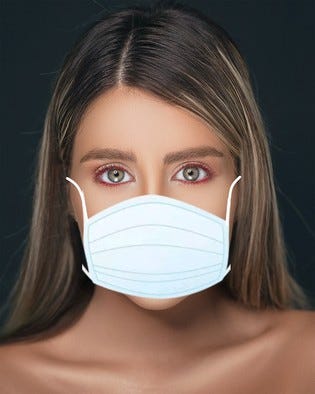
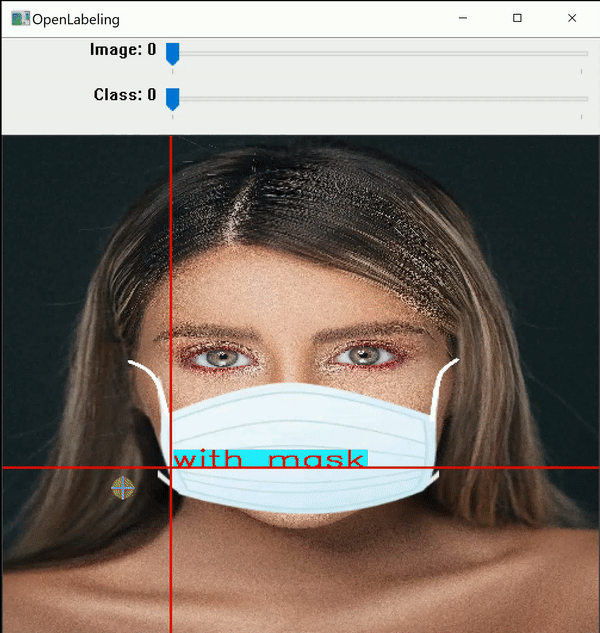
Input image (Image1.jpg)
You can use up any software for labeling like the labelImg tool.
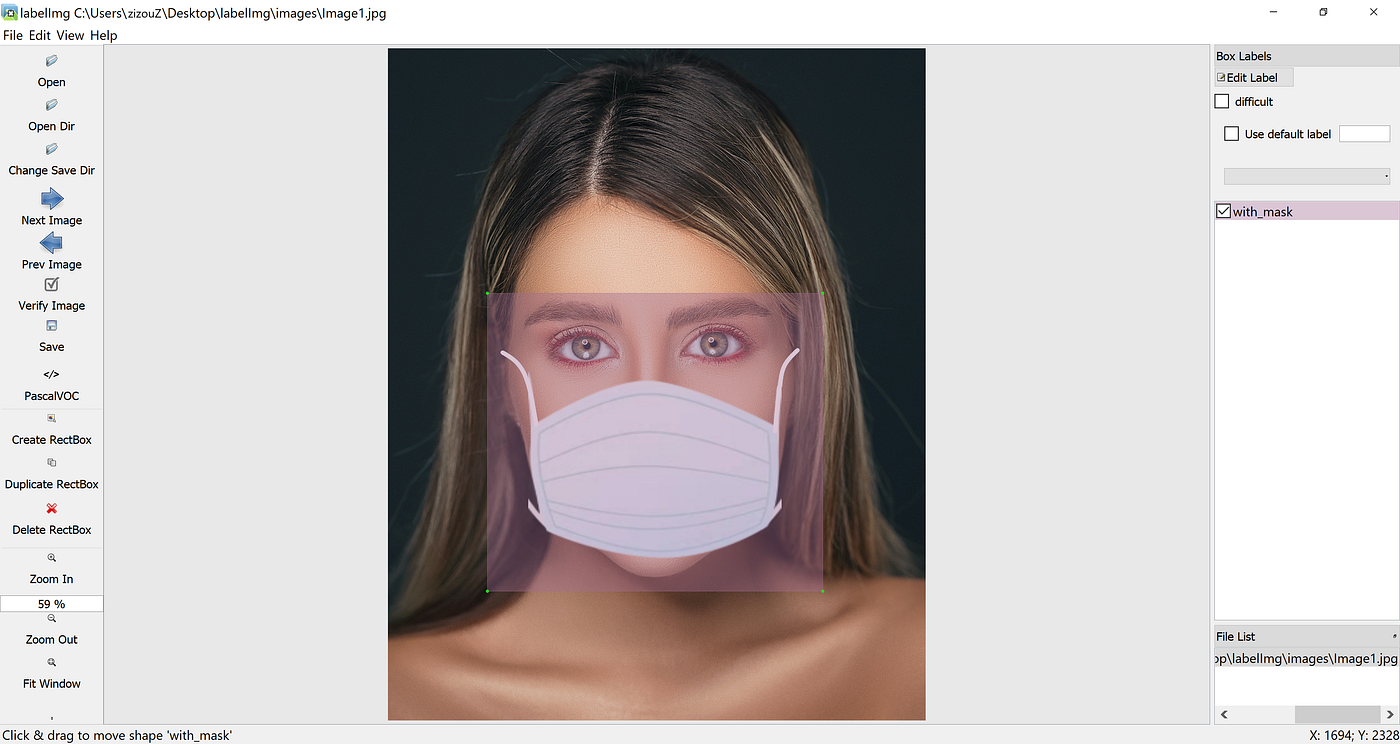
I use an open-source labeling tool around titled OpenLabeling with a very bare UI.
Click on the connect below to cognise more about the labeling process and other software for it:
- Image Dataset Labeling Medium Emily Price Post
NOTE : Garbage In = Garbage Out. Choosing and labeling images is the most life-and-death part. Try to find good quality images. The quality of the information goes a long fashio towards determining the quality of the result.
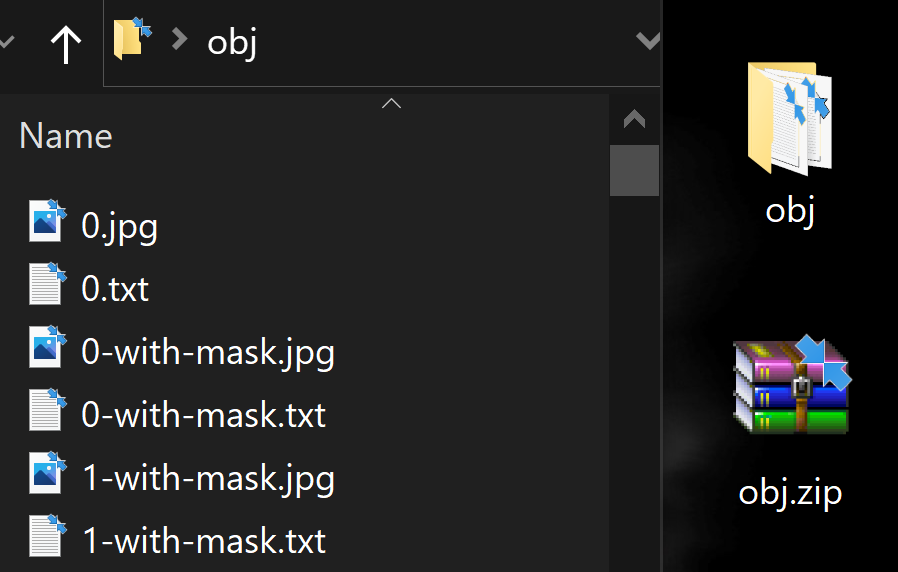
The output YOLO format labelled file cabinet looks as shown below.

3(a) Create and upload the labeled custom dataset "obj.null" file to the "yolov4-tiny" folder on your drive
Put entirely the input image ".jpg" files and their corresponding YOLO format labeled ".txt" files in a folder named obj.
Make over its zip fastener file obj.zip and upload it to the yolov4-tiny folder on your drive.
3(b) Create your custom config file away and upload information technology to the 'yolov4-tiny' folder on your drive
Download the yolov4-bantam-custom.cfg file away from darknet/cfg directory, make changes to it, and upload it to the yolov4-small folder on your drive.
You can also download the tradition config files from the official AlexeyAB Github.
Make the following changes in the custom-built config file:
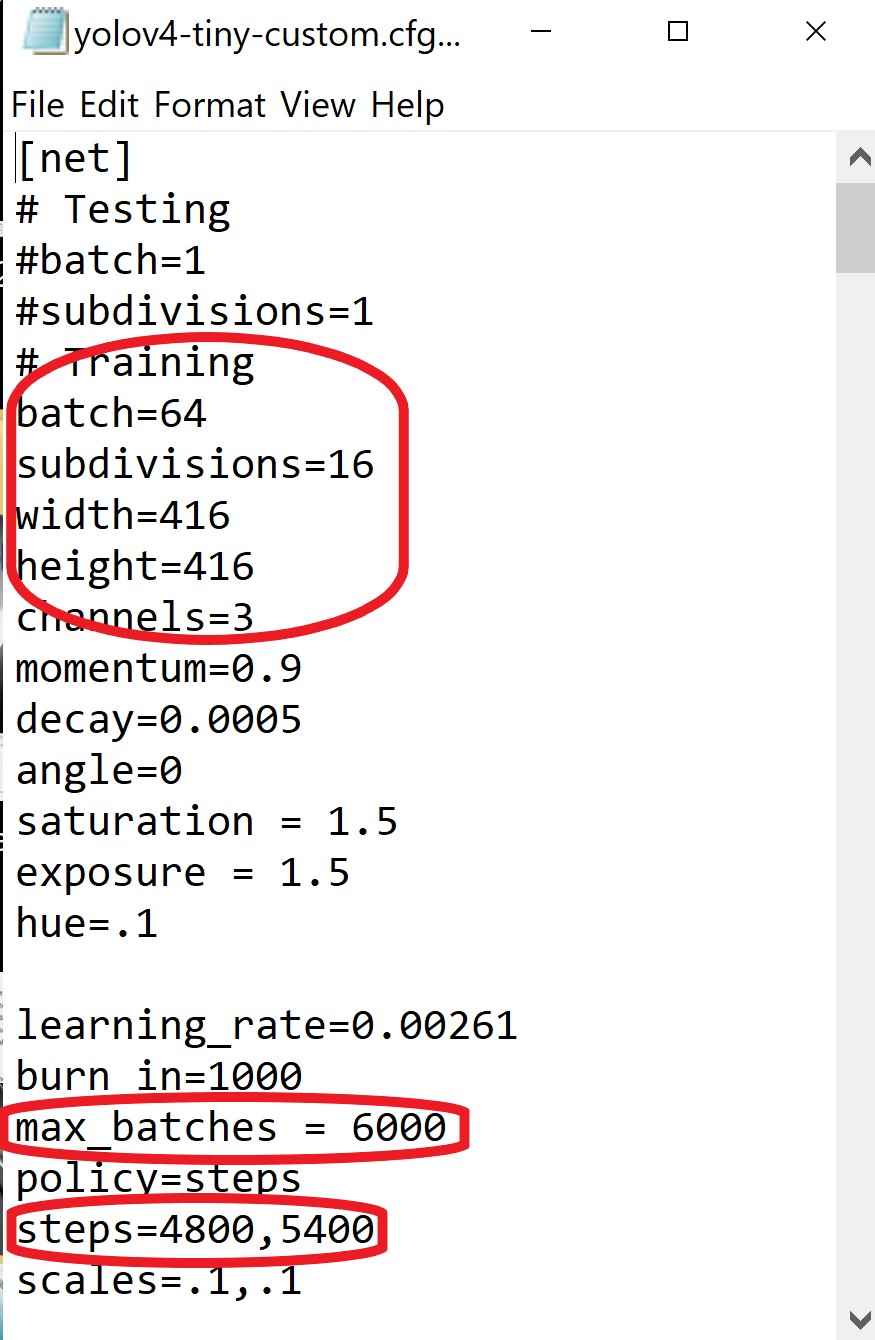
- change communication channel batch to heap=64
- convert line subdivisions to subdivisions=16
- set network size breadth=416 tiptop=416 or any value multiple of 32
- interchange line max_batches to (classes*2000 but not less than the number of training images and non to a lesser extent than 6000), f.e. max_batches=6000 if you train for 3 classes
- change line steps to 80% and 90% of max_batches, f.e. stairs=4800,5400
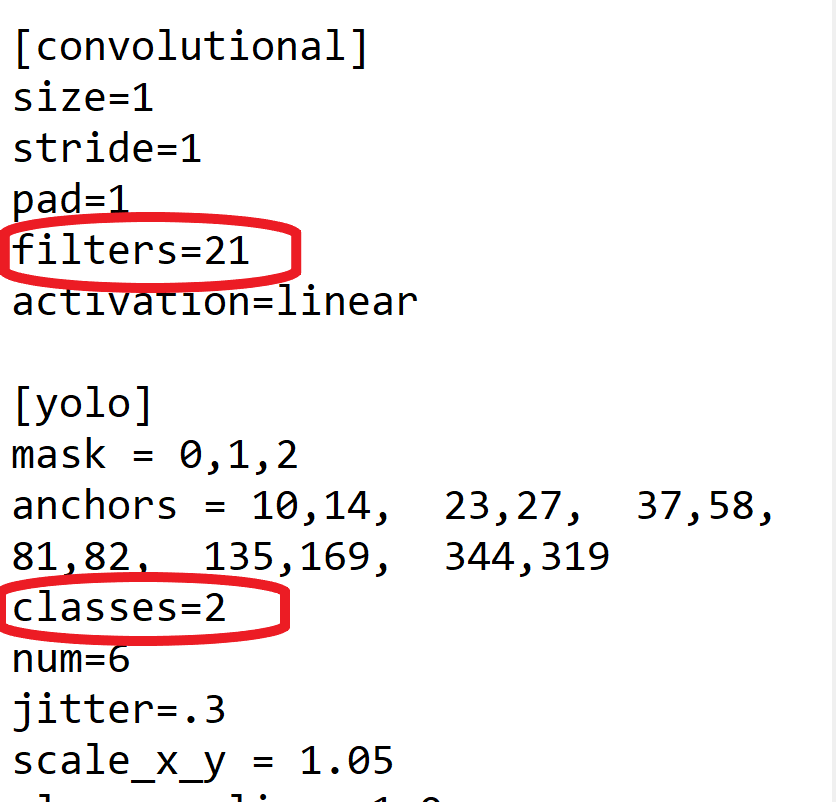
- change [filters=255] to filters=(classes + 5)x3 in the 2 [convolutional] before each [yolo] stratum, keep in thinker that it only has to be the last [convolutional] before each of the [yolo] layers.
- change line classes=80 to your number of objects in from each one of 2 [yolo]-layers
So if classes=1 then it should make up filters=18. If classes=2 and so write filters=21.
You can tweak other parameter values excessively corresponding the learning value, tip, saturation, exposure, and hue once you've understood how the fundamentals of the training process work. For beginners, the above changes leave suffice.
NOTE: What are subdivisions?
- It is the number of many mini-batches we split our batch into.
- Batch=64 -> loading 64 images for unrivaled loop.
- Subdivision=8 -> Split batch into 8 mini-batches so 64/8 = 8 images per mini-batch and these 8 images are transmitted for processing. This process will be performed 8 times until the batch is completed and a new iteration will start with 64 new images.
- If you are victimisation a GPU with low memory, set a high value for subdivisions ( 32 or 64). This will obviously take yearner to train since we are reducing the list of images being loaded and also the act of mini-batches.
- If you have a GPU with high memory, ordered a take down rate for subdivisions (16 or 8). This will speed leading the education process as this loads many images per looping.
3(c) Create your "obj.data" and "obj.name calling" files and upload them to your drive
obj.data
The obj.data file cabinet has :
- The number of classes.
- The path to train.txt and test.txt files that we testament create later.
- The path to obj.names Indian file which contains the names of the classes.
- The path to the breeding pamphlet where the education weights will be regenerate.
obj.names
Has objects' name calling — each in a new line. Make sure the classes are in the same order as in the class_list.txt file exploited while labeling the images so the index id of every class is the same as mentioned in the labeled YOLO txt files.
3(d) Upload the cognitive operation.py hand lodge to the "yolov4-tiny" folder connected your drive
(To divide all image files into 2 parts. 90% for train and 10% for test)
This process.py script creates the files train.txt & essa.txt where the school.txt file has paths to 90% of the images and test.txt has paths to 10% of the images.
You can download the process.py script from my GitHub .
**Chief: The "process.py" script has only the ".jpg" format written in information technology, sol other formats such as ".png",".jpeg", or even ".JPG"(in capitals) won't constitute recognized. If you are using any other formats, realise changes in the process.py book file accordingly.
Immediately that we deliver uploaded all the files, our yolov4-bantam pamphlet along our drive should look ilk this:

4) Mount drive and link your folder
Climb on drive
            %compact disk ..
from google.colab significance drive
drive.hop on('/content/gdrive')
Link your pamphlet
Run the following command to make over a symbolic link so that forthwith the route /content/gdrive/My\ Tug/ is equal to /mydrive
!ln -s /content/gdrive/My\ Force/ /mydrive 5) Construct changes in the makefile to enable OPENCV and GPU
(Likewise set CUDNN, CUDNN_HALF, and LIBSO to 1)
            %cd darknet/
!sed -i 's/OPENCV=0/OPENCV=1/' Makefile
!sed -i 's/GPU=0/GPU=1/' Makefile
!sed -i 's/CUDNN=0/CUDNN=1/' Makefile
!sed -i 's/CUDNN_HALF=0/CUDNN_HALF=1/' Makefile
!sed -i 's/LIBSO=0/LIBSO=1/' Makefile
6) Run make command to build darknet
!make 7) Copy all the files from the 'yolov4-tiny' folder to the 'darknet' directory in Colab VM
The ongoing working directory is /content/darknet
Clean the information and cfg folders except for the labels folder inside the data folder which is required for writing mark down name calling on the signal detection boxes.
So just remove all other files from the data leaflet and all clean the cfg folder as we already have our custom config Indian file in the yolov4-tiny folder on our ram down.
This step is optional.
            %cd data/
!find -maxdepth 1 -type f -exec rm -rf {} \;
%cd ..            %rm -rf cfg/
%mkdir cfg
7(a) Copy the obj.zip file from your drive into the darknet directory and unzip it into the data pamphlet in the Colab VM
!cp /mydrive/yolov4-tiny/obj.zero ../ !unzip ../obj.zip -d data/
7(b) Copy your yolov4-tiny-custom.cfg file away and then that information technology is today in /darknet/cfg/ folder in the Colab VM
!cp /mydrive/yolov4-petite/yolov4-tiny-customs.cfg ./cfg 7(c) Imitate the obj.name calling and obj.data files so that they are now in /darknet/information/ folder in the Colab VM
            !cp /mydrive/yolov4-tiny/obj.names ./data
!cp /mydrive/yolov4-tiny/obj.data  ./data
7(d) Copy the operation.py file into the current darknet directory in the Colab VM
!cp /mydrive/yolov4-tiny/process.py ./ 8) Hightail it the swear out.py python handwriting to make up the train.txt & test.txt files interior the data folder
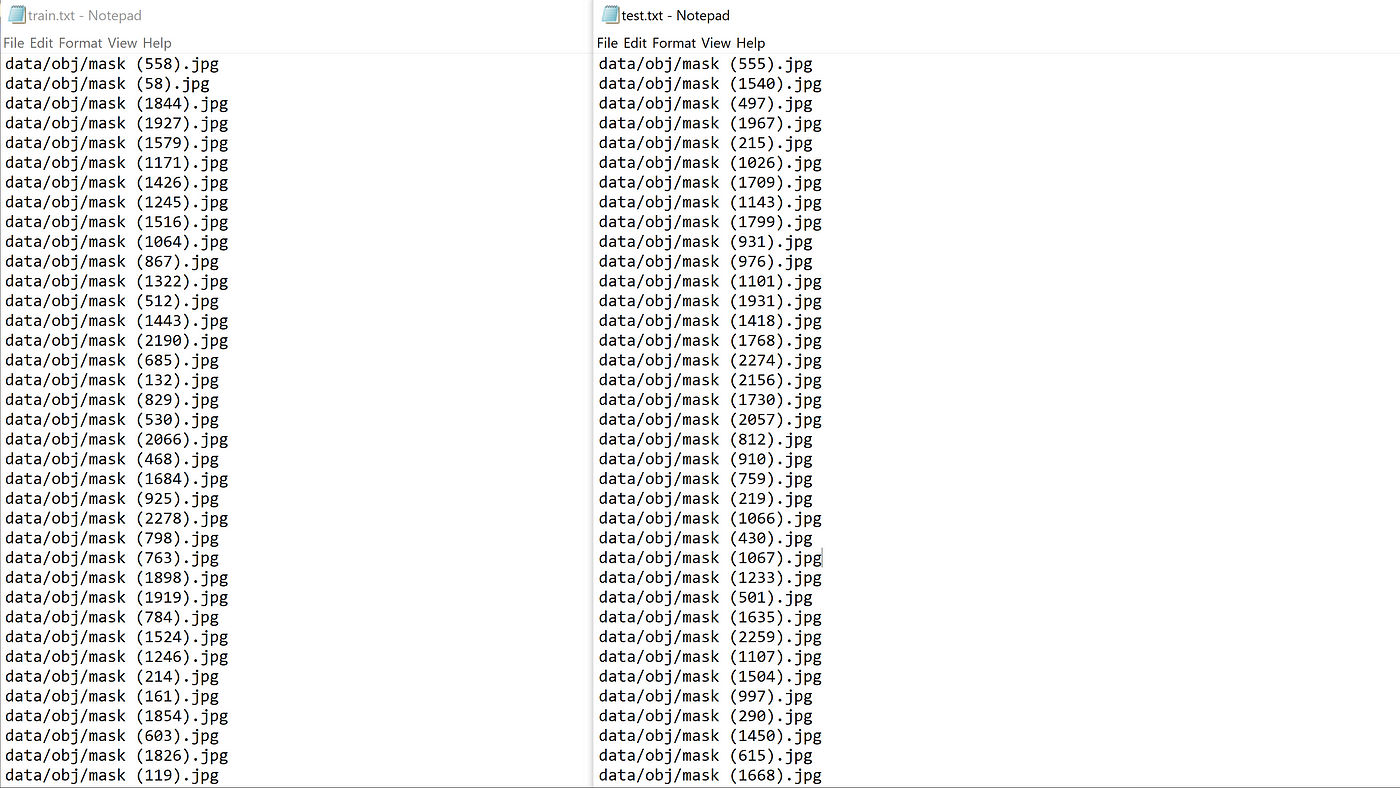
!python process.py List the contents of the data folder to check if the take.txt and test.txt files take up been created
!ls information/ The above process.py script creates the two files groom.txt and test.txt where train.txt has paths to 90% of the images and test.txt has paths to 10% of the images. These files seem like as shown to a lower place.
9) Download the pre-potty-trained YOLOv4-tiny weights
Here we use remove learning. Instead of training a model from scratch, we use pre-trained YOLOv4-petite weights which have been trained busy 29 convolutional layers. Run the following command to download the YOLOv4-tiny pre-trained weights file.
!wget https://github.com/AlexeyAB/darknet/releases/download/darknet_yolo_v4_pre/yolov4-tiny.conv.29 10) Training
Train your custom sensor
For best results, you should stop the training when the average loss is less than 0.05 if possible or at to the lowest degree constantly below 0.3, else train the modeling until the average loss does not show any epoch-making change for a spell.
!./darknet detector train data/obj.data cfg/yolov4-tiny-custom.cfg yolov4-tiny.conv.29 -dont_show -map The map parameter here gives us the Mean Average Precision. The higher the mAP the amend it is for objective detection.
You can visit the functionary AlexeyAB Github page which gives a detailed account on when to stop training. Click on the link infra to jump to it division.
To restart your training (In case the training does not finish and you get disconnected)

If you get disconnected or lose your session, you assume't have to start breeding your model from lettuce again. You rear resume training from where you left off. Use the weights that were saved last. The weights are salvageable every 100 iterations as yolov4-diminutive-custom_last.weights in the yolov4-tiny/education folder on your drive. (The path we gave as backup in "obj.information" file).
Run the following mastery to restart training.
!./darknet detector prepare data/obj.data cfg/yolov4-tiny-custom.cfg /mydrive/yolov4-tiny/training/yolov4-tiny-custom_last.weights -dont_show -map Use this simple hack for Auto-Click to avoid existence kicked off Colab VM
Press (Ctrl + Shift + i) . Go to console. Paste the succeeding code and printing press Move into.
            function ClickConnect(){
console.log up("Working");
document
              .querySelector('#top-toolbar > colab-connect-release')
              .shadowRoot.querySelector('#connect')
              .click()
}
setInterval(ClickConnect,60000)
11) Check carrying out
Define assistant function imShow
            def imShow(path):            import cv2
moment matplotlib.pyplot as plt
%matplotlib inline
image = cv2.imread(path)
height, width = image.figure[:2]
resized_image = cv2.resize(image,(3*width, 3*height), interpolation = cv2.INTER_CUBIC)
fig = plt.gcf()
fig.set_size_inches(18, 10)
plt.bloc("sour")
plt.imshow(cv2.cvtColor(resized_image, cv2.COLOR_BGR2RGB))
plt.show()
Check the training chart
You can check the performance of all the disciplined weights aside looking for at the chart.png file. However, the chart.png file only if shows results if the grooming does not drive interrupted i.e. if you do not get disconnected or lose your sitting. If you restart training from a saved point, this will not work.
imShow('chart.png') If this does not mold, on that point are other methods to check your carrying into action. One of them is by checking the mAP of the trained weights.
Check mAP (miserly average precision)
You commode check mAP for all the weights found every 1000 iterations for eg:- yolov4-tiny-custom_4000.weights, yolov4-diminutive-custom_5000.weights, yolov4-tiny-custom_6000.weights, and so on. This fashio you will love which weights file will give you the optimal result. The higher the correspondenc the better it is.
Run the following overlook to mark the mAP for a finicky protected weights file where xxxx is the loop number for it.(eg:- 4000,5000,6000,…)
!./darknet detector map data/obj.data cfg/yolov4-bantam-custom.cfg /mydrive/yolov4-midget/breeding/yolov4-tiny-custom_xxxx.weights -points 0 12) Test your custom Object Detector
Make changes to your custom-made config file to set it to test mode
- change line batch to batch=1
- change line subdivisions to subdivisions=1
You dismiss do IT either manually or by simply running the encrypt below
            %cd cfg
!sed -i 's/batch=64/good deal=1/' yolov4-tiny-customized.cfg
!sed -i 's/subdivisions=16/subdivisions=1/' yolov4-tiny-usance.cfg
%standard candle ..
Run detector along an image
Upload an image to your Google drive to run.
Run your custom detector on an image with this command. (The thresh flag sets the nominal accuracy required for object detection)
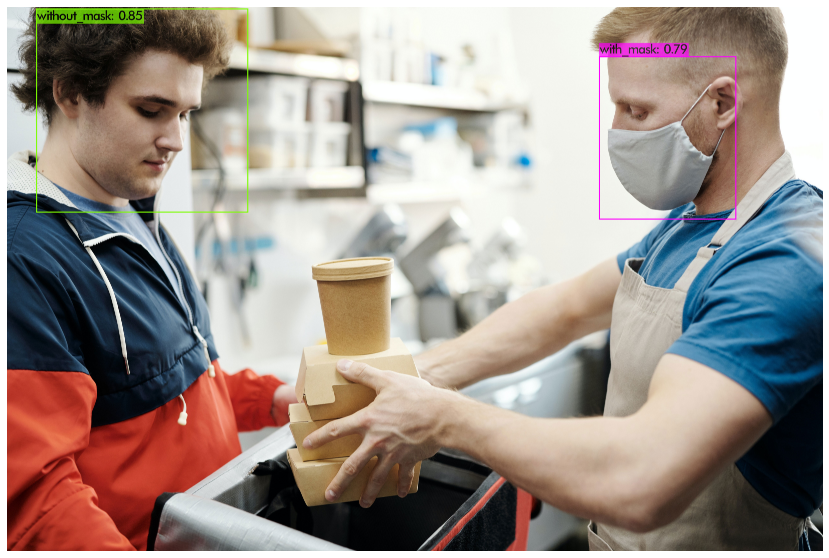
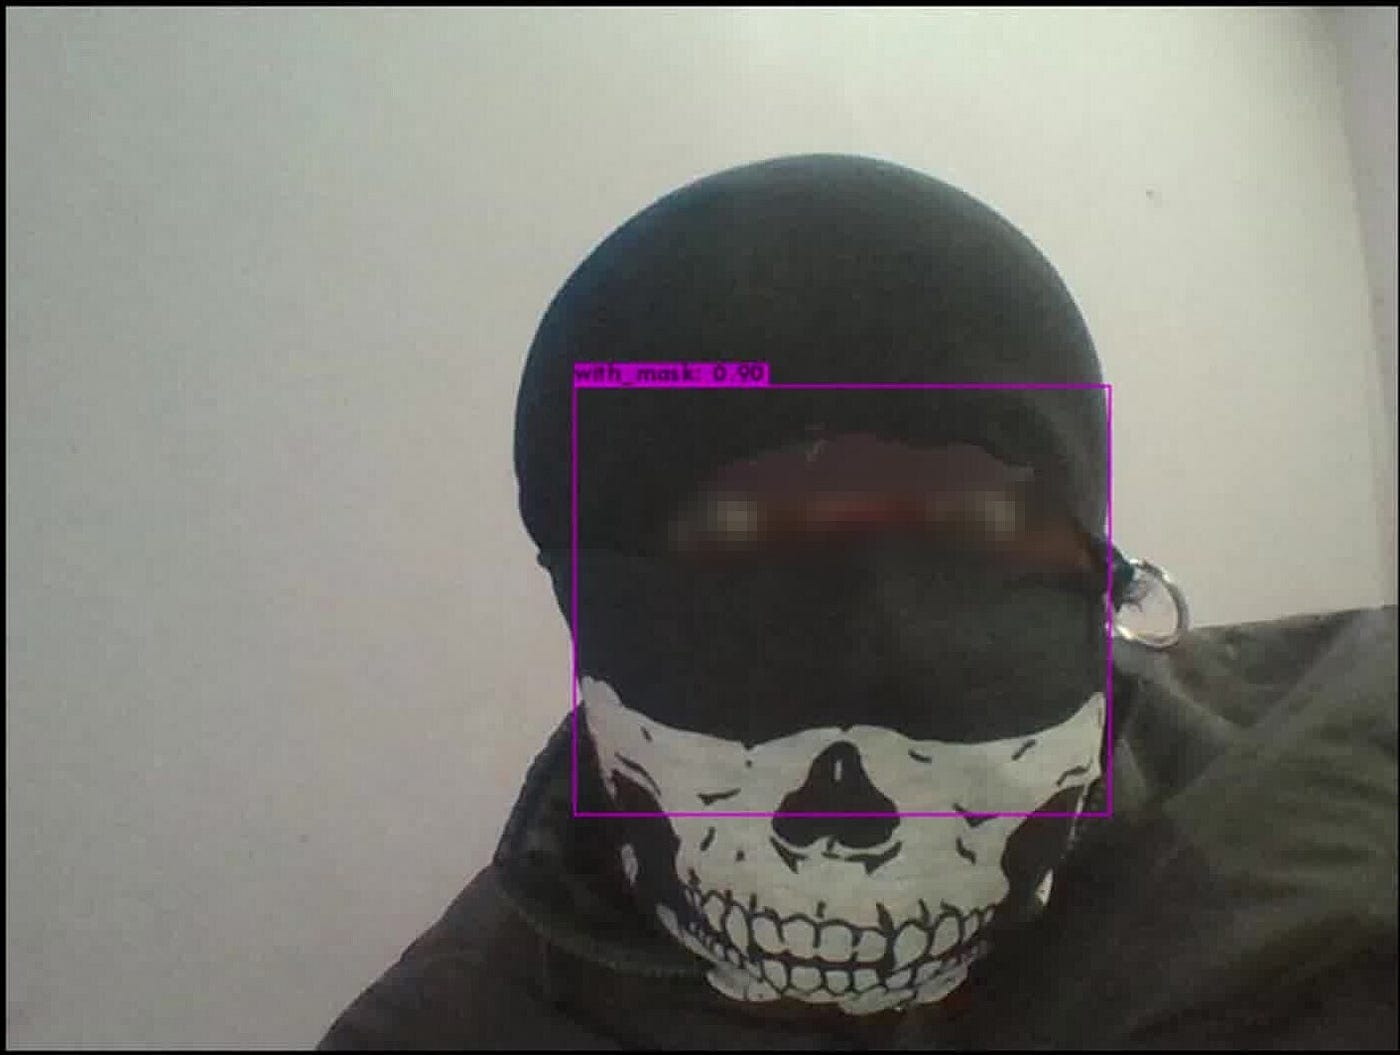
!./darknet detector tryout data/obj.information cfg/yolov4-tiny-custom.cfg /mydrive/yolov4-tiny/training/yolov4-tiny-custom_best.weights /mydrive/mask_test_images/image1.jpg -thresh about 0.3 imShow('predictions.jpg')
Run detector along webcam images
For running detector on images captured by a webcam run the following code. This is the camera code snipping provided by Colab except for the last two lines which run the detector on the saved image.
Run detector along a video
Upload a TV to your google cause to test.
Run your custom sensing element happening a video with this command. (The thresh flag sets the borderline accuracy required for object detection). This saves the output television with the detections in your output path
!./darknet detector demonstration data/obj.data cfg/yolov4-tiny-customs.cfg /mydrive/yolov4-tiny/training/yolov4-tiny-custom_best.weights -dont_show /mydrive/mask_test_videos/test1.mp4 -thresh about 0.7 -i 0 -out_filename /mydrive/mask_test_videos/results1.avi 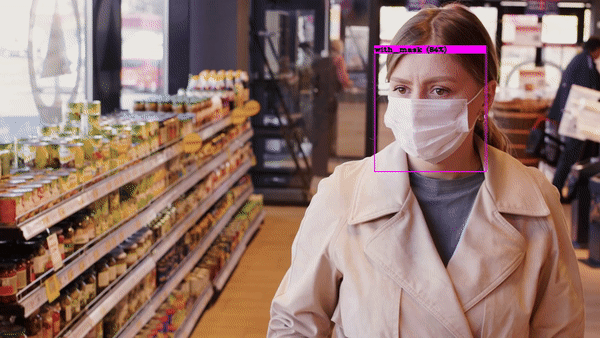
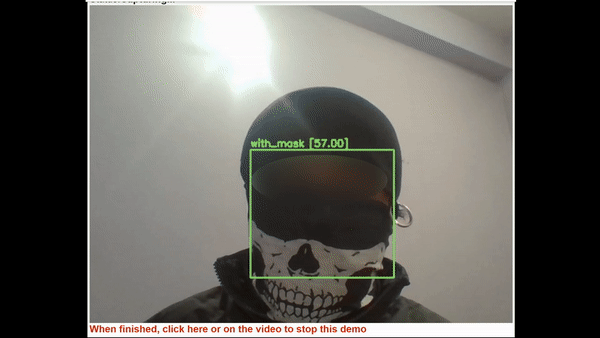
Run detector along a live webcam
Prototypic Import dependencies, delimit helper functions and load your custom YOLOv4-tiny files, and past run the demodulator happening a webcam.
Pass the code to a lower place.
Mention:
The dataset I have collected for cloak detection contains mostly conclusion-up images. For Thomas More long-scene images you can search online. There are many sites where you john download labelled and unlabeled datasets. I take over donated a a few links at the bottom under Dataset Sources. I have also precondition a few links for mask datasets. Roughly of them have to a higher degree 10,000 images.
Though thither are certain tweaks and changes we can make to our training config file or hyperkinetic syndrome more images to the dataset for every type of object class through augmentation, we have to be careful soh that it does not cause overfitting which affects the truth of the model.
For beginners, you nates get-go simply by using the config file I have uploaded on my GitHub. I undergo also uploaded my mask images dataset along with the YOLO formatting labeled text files, which although mightiness not be the best but will give you a good start on how to train your own custom detector model using YOLO. You can recover a labeled dataset of better quality or an unlabeled dataset and label it yourself by and by.
My GitHub
I have uploaded my custom-made mask dataset and all the unusual files needful for training Yolov4-bantam sensing element on my GitHub link below.
My Tagged Dataset (obj.zip)
My Colab notebook for YOLOv4-tiny preparation
If you found this article face-saving, please take to my YouTube channel or regard supporting me on Patreon / BuyMeACoffee🖖
My YouTube telecasting on this!
Put on't forget to leave a 👏
Undergo a smashing day !!! ✌
♕ TECHZIZOU ♕
Gross Weight of Last 8 Draw Tool Box
Source: https://medium.com/analytics-vidhya/train-a-custom-yolov4-tiny-object-detector-using-google-colab-b58be08c9593
0 Response to "Gross Weight of Last 8 Draw Tool Box"
Post a Comment